
Tuesday, May 12, 2015
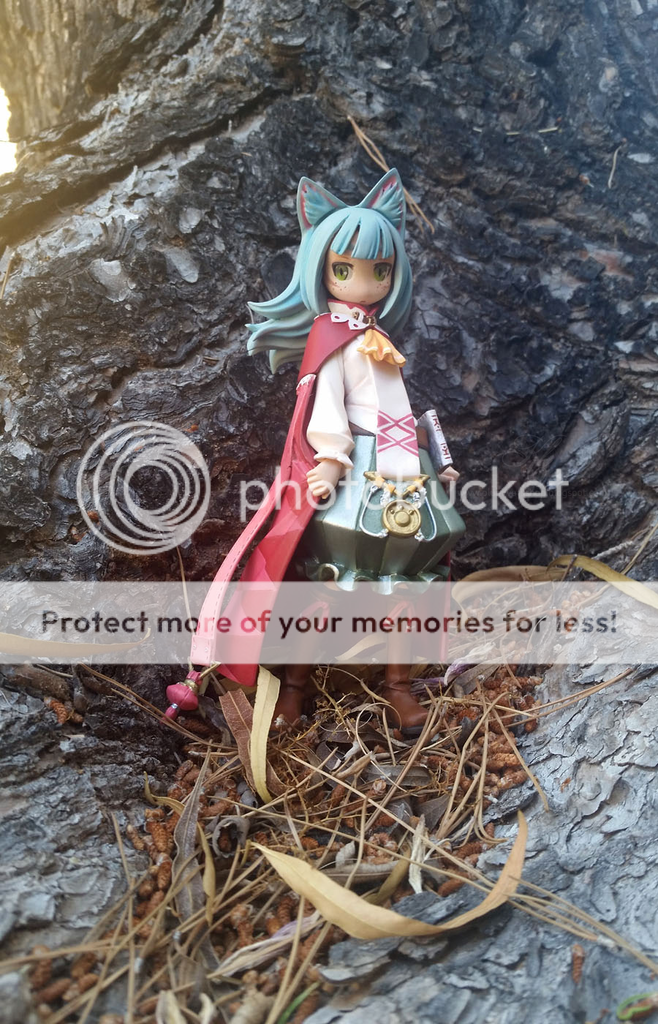
Nonscale Mage - 7th Dragon
I finally hit the double digits! This little mage (a representation of my character Milandia in FFXIV) by Utsunekotei is my 10th kit. It's hard to believe how far I've come since my first build and to be honest I'm quite proud of this one. As always everything is hand-painted with craft acrylic paint and is shaded with Mungyo pastels.

Sunday, May 10, 2015
Painting Eyes: A Quick Walkthrough
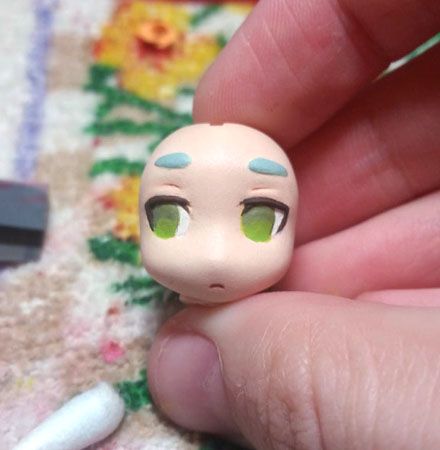
You know those times when you get so ambitious on a project you end up doing way more than is necessary? That is definitely me with this garage kit right now. Because I'm feeling slightly insane and want to put off the nervousness from starting my job on Monday I decided to create a little WIP on how I paint eyes. I know I did one before in my GK Compendium series but it's always fun to take a bunch of photos and see everything step-by-step. So for those who are seasoned pros and curious or for those who are just scared of hand-painting eyes this is for you!
*Note: These eyes are approximately 0.5cm in height and length. You CAN paint those tiny eyes as long as you have thin paintbrushes ;)
I started out by painting the schlera a nice off-white. I'm a huge fan of the acrylic paint "Seashell White" by Delta Ceramcoat and use it for pretty much everything since regular white paint is a little too bright for me. Make an outline in pencil where you want to paint your iris and make sure they are facing the same direction.
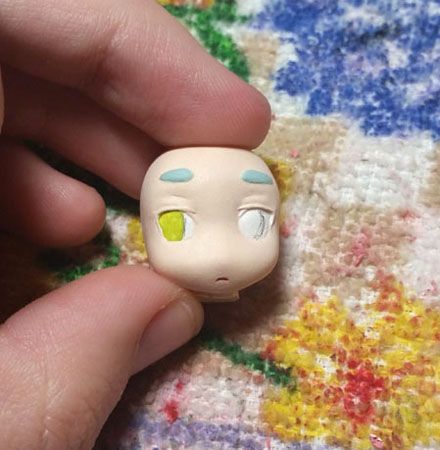
Paint the lightest color of your eye in thin coats. The consistency of your paint is very important here. If it's too runny paint will run all over your eyeball but if it's too thick you'll end up with streaky lines. Try to stay within the lines you created with pencil. Make sure both eyes have around the same size iris or you'll get a weird looking crazy eye lol.
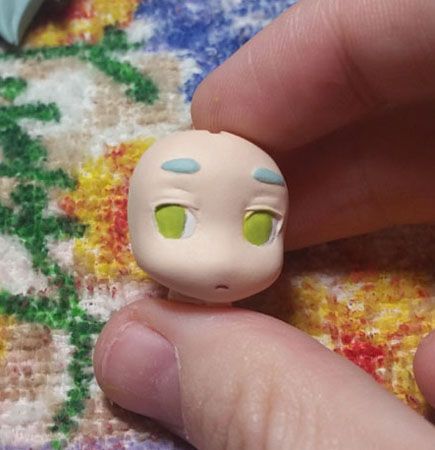
Apply the next color onto your eye. It's up to you how you do this but generally try to paint one to two shades darker on top of your lightest color - this will ensure that the contrast on your eye isn't too striking (in a bad way lol). I like to paint in a U-shape that ends around halfway on the eyeball.
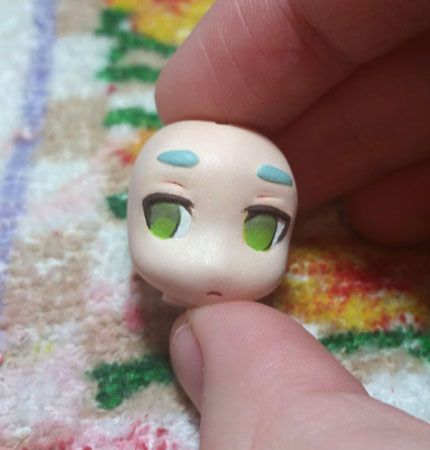
The next few steps can be done in any order and I've mixed it up before so it just depends on your mood. ^^ In this case I decided to paint her eyelashes. On some kits you're lucky and the eyelids are already sculpted for you but sometimes you have to paint onto a flat surface. The key to painting eyelashes is sharp lines - notice how the ends of my eyelashes are very pointy. There are thousands of different eye styles but almost all of them have an angle somewhere in there. Get confident with painting angles! At this point I also added an upper eye crease with a 0.005 brown micron pen.
Oh also you can paint the eyelashes whatever color you want, it depends on the colors of your kit I guess. I usually paint my eyelashes black but in this case it was way too harsh so I mixed two different colors of brown together (it's still pretty dark though haha).
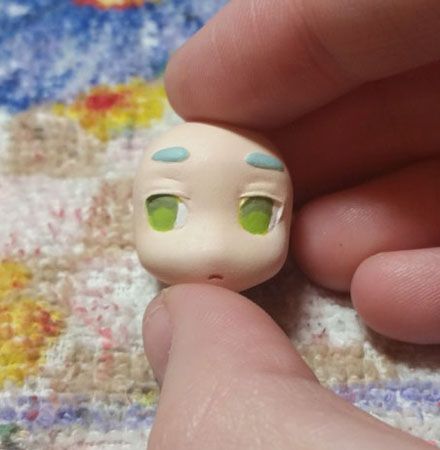
Not much has changed in this step except I decided to outline her eye with a 0.05mm mechanical pencil.
Lastly I added the classic anime eye shine (white dot) and her pupil. This also varies from character to character but I was going for more of a striking cat eye slit.
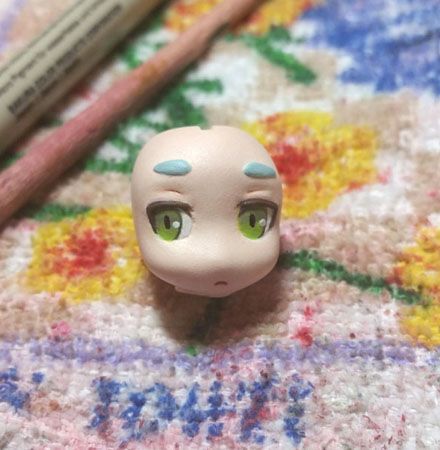
And here's another tiny thing I did just to show you how much of a difference a simple change in lines can entirely change the kit's appearance. Notice how the iris in the picture above is rounded compared to the picture below where the iris is pointed at the ends. Feels more like a feline, right?
I also added her markings and shaded a little bit above on her eyelid.
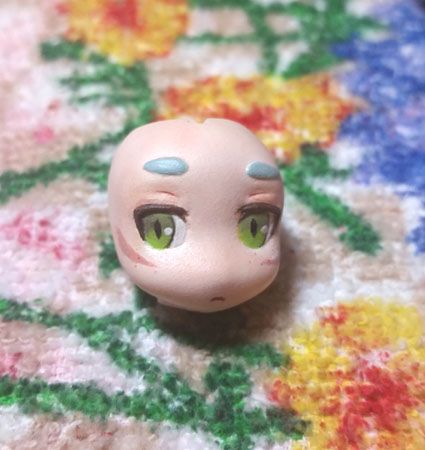
At this point I had already finished my kit but did a couple of other things like making her freckles a little larger and adding some more shading on her face. You can't see it in this photo but I also added Pledge Future FloorCare to her eyes to make them super shiny. I did this on my Nostradamus kit as well and it really makes them stand out ^^

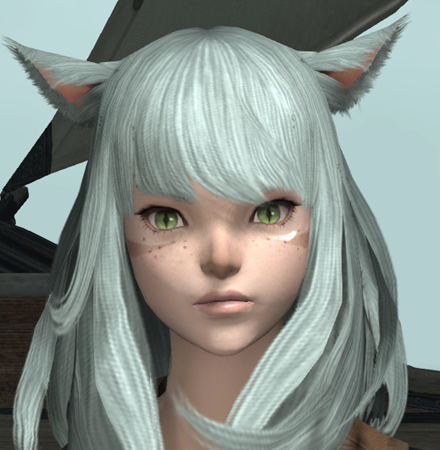
EH CLOSE ENOUGH. I just realized how blue my kit's hair looks though...I didn't even use blue idk how that happened LOL
There are countless ways you can paint your eyes whether it's changing the color of the iris, the shape of the eyelashes or where you put that classic anime shine. I find it helpful to experiment with different eye types by drawing them on paper as well. I generally add two to three colors on my eyes to create a gradient but it depends how ambitious and/or comfortable you are with your kit. Also helpful is how big the eyes on your kit are - the bigger your eye generally the more detail you can add.
And also for the love of god PLEASE do not forget to paint eyebrows on your kit. I have an obsession thing for strong eyebrow game and every time I see a kit without eyebrows I silently weep for the poor character whose eyebrows were singed off in a horrible accident.
Stay tuned tomorrow (well technically today now) for the finished product and thanks for reading ^^
Sunday, May 3, 2015
Third Time's the Charm
Hello friends, GK builders and everyone in-between! I realized it's been over a month already with no updates so I figured it's time for another post.
I haven't been completely lazy on the GK front as you'll see in a moment but I have been doing other stuff as well. As some of you probably know I graduated with a bachelor's degree back in December but what you might not have known was that I wasn't having much luck in the job front. I began volunteering last month for fun and had been applying for jobs pretty regularly online but nothing was coming from it. However thanks to networking I am happy to say that after a little over four months that has changed and in two weeks I'll be officially employed in a real job in my field! I am very lucky but just want to say to anyone looking for a job be professional, don't get discouraged, make those connections and use them to your advantage. Anyway having that job means that I will have less time online but hopefully I won't be too exhausted to do anything.
Because of this new situation I am giving myself a deadline to finish this Mage figure by next Sunday. I WILL DO IT! I'm pretty much almost done but her cape is giving me so much trouble -_- Here are some pics:


 Here's where the real trouble starts. So I initially didn't tape this cape at all and just went to town painting the squares a dark red. I didn't like it at all though and the red wouldn't go on evenly so I decided forget it! I'll strip the paint and try masking tape like a real builder cause I'm a pro
 Hahaha bad idea :( The pink went on nicely but the red was ugly and parts of it were stripped off. Red is a really hard color to paint evenly! I also painted too many layers which screwed things up; it's kind of hard to explain but the more layers you paint the more paint gets built up so when you take off the masking tape you can sometimes be left with thick paint that doesn't match up with the rest of the areas you didn't mask (wow that made zero sense). Anyway I figured out that the deep red was not what I wanted at all a little too late. I wish I took a before picture but the pink I used for those little ribbon things looked even worse contrasting against these colors. Ughughgugh
 SO I PRIMED IT AGAIN! Notice that you can still see the red in some spots and some areas are a little rough. I was too lazy to fix this since her cape is in the back anyway and you won't really be able to notice it unless you really look.
 Paint in progress. I decided against the masking tape, I will deal with the excess paint somehow (probably Windex and a Q-tip lol). Instead of a deep red this time I think I'm just going to go with a deeper, redder pink but not quite burgundy.


 More parts without shading or details which I think came out really cute. The pink looks sooooo much better than the dark red I wish I took more pictures. It especially goes well against her little orange collar and the greens of her skirt thing.
That's all the pictures I have now but I will try to take a couple more before I finish up this kit. I've got a lot of work to do on it this week since I have to finish painting all the parts, add details, add shading, glue it all together, build a small book for her to hold, and build a custom base. Most of those shouldn't be to hard and I am definitely up for the challenge now that I have a goal ^^
I just feel like I don't want today to end, have you ever had a day like that? Take care everyone.
I haven't been completely lazy on the GK front as you'll see in a moment but I have been doing other stuff as well. As some of you probably know I graduated with a bachelor's degree back in December but what you might not have known was that I wasn't having much luck in the job front. I began volunteering last month for fun and had been applying for jobs pretty regularly online but nothing was coming from it. However thanks to networking I am happy to say that after a little over four months that has changed and in two weeks I'll be officially employed in a real job in my field! I am very lucky but just want to say to anyone looking for a job be professional, don't get discouraged, make those connections and use them to your advantage. Anyway having that job means that I will have less time online but hopefully I won't be too exhausted to do anything.
Because of this new situation I am giving myself a deadline to finish this Mage figure by next Sunday. I WILL DO IT! I'm pretty much almost done but her cape is giving me so much trouble -_- Here are some pics:
I like the somewhat messy worn-in leather look which is why the boots are kinda different colors
Her skirt thing is shiny!
That's all the pictures I have now but I will try to take a couple more before I finish up this kit. I've got a lot of work to do on it this week since I have to finish painting all the parts, add details, add shading, glue it all together, build a small book for her to hold, and build a custom base. Most of those shouldn't be to hard and I am definitely up for the challenge now that I have a goal ^^
I just feel like I don't want today to end, have you ever had a day like that? Take care everyone.
Subscribe to:
Posts (Atom)